The Sansevieria group makes up some of my favorite houseplants. Scientists recently placed them in the genus Dracaena, but its former scientific name seems to also be one of its common names. I will continue to refer to it as Sansevieria in this article to avoid confusion. In the future, you will most likely see the plant tags that come with plants offered for sale finally catch up with this change in the scientific community. This plant has many common names including “snake plant” and my personal favorite “mother-in-law’s tongue”.  Like many varieties of houseplant, there are some staples that have been around for decades, some newer species that have come to market, and some really interesting cultivars or hybrids of all of them. 

A tall variety of Sansevieria trifasciata with gold edges. Photo by mrl2024.

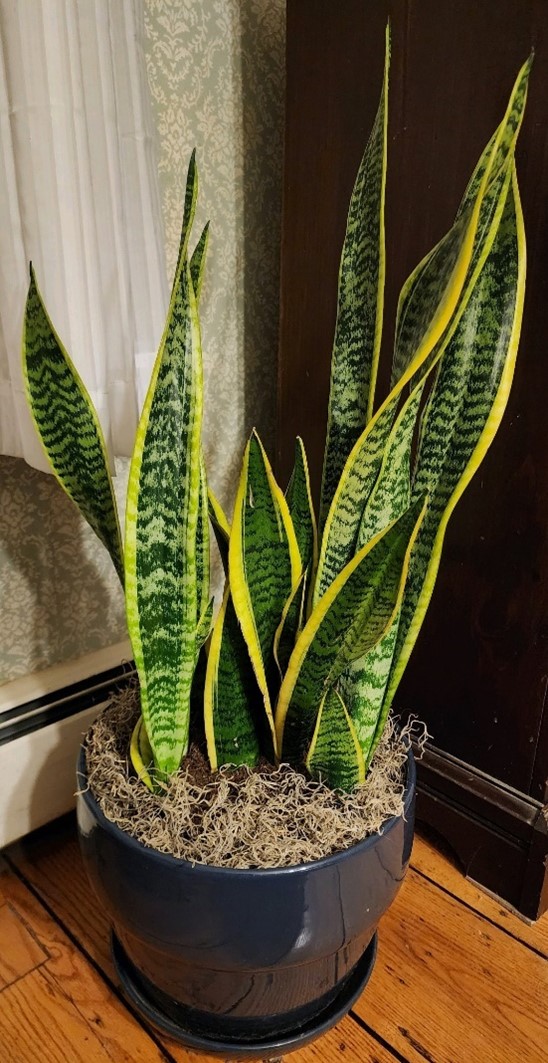
These plants have a rhizome, and the leaves grow from the base of your pot. They are very prolific when they like their environment. In fact, they tend to break the pots they are in, so I would recommend using plastic pots, which their growth will eventually deform. If you want to use a clay or ceramic pot, I suggest putting them in a slightly smaller plastic pot, then putting that in the clay pot. You can hide the gap between the two pots with Spanish moss. Being native to Africa, they cannot tolerate cold temperatures. Typical household temperatures work well, but avoid anything below 55 degrees F. If kept too cold, they will die and rot from the base up. By the time you notice there is a problem, it is too late to do anything about it. Another thing that is nice for the plant collector is that their upright growth habit allows the grower to have many varieties in a small space.

Overwatering is the quickest way to kill any houseplant, but especially so with these. In the winter, you probably only want to water once a month, and sparingly at that. Do not let them get soggy or this otherwise hardy plant will rot. In the warmer months when the plant is actively growing, allow the soil to dry between waterings, but then water more liberally. Some growers will add extra perlite to the mix to aid in drainage. I have not had trouble keeping them in a standard mix, but you certainly need to be careful with watering. Choose the mix that will work best for your plant hydration habits. These plants have the reputation of being a low light plant, which they certainly can handle. Sometimes, however, people place them in the darkest corner of a room where they hang on for a few months, but then eventually run out of stored resources and die. Remember they do need some light to photosynthesize so bright indirect light is best. The other problem I have seen is their unique, flat leaves can become covered in dust. Either dust them manually, use a blower, or take them outside in warm weather and hose them off. A damp cloth run gently over the leaves is probably the easiest method, but becomes more difficult and time consuming with a rather large collection.    

Sansevieria trifasciata ‘Golden Hahnii’ before (top) and after (bottom) division and repotting. Here, each baby plant got its own pot. Photo by mrl2024.

All varieties of Sansevieria are fairly easy to propagate. If you want more plants quicker, you can take leaf cuttings. You either dip in rooting hormone and replant, or you can place the cuttings in water to take root (change the water daily for best results). You must be careful with the orientation, as you want to plant the bottom side of the cutting into the soil, not the top, which will fail to root. It is easy to get confused and forget which end is up. Some people put a mark on the top or bottom, others cut in such a way as to indicate the bottom. It really doesn’t matter which method you choose, if any, as long as the cuttings are oriented properly at planting time.  There is one big problem with using cuttings – the babies will look like the standard green variety, and not have any of the nice golden edges, so be careful with this method. I also don’t like doing this as it, in my opinion, just looks unsightly. The remaining stub on the parent plant looks awful. If I was to do this, I would recommend cutting near the base of the plant by the soil surface. The cut leaf will not regrow, and instead just will look damaged. In the new pot where the cutting was placed, you still have to look at the cutting as it does not grow. It is not until the baby plants growing from the base are big enough that you can separate it from this actual cutting piece. 

My favorite way to propagate these plants is to let them grow, and then divide them during repotting. You simply pull the plant out of the pot and divide the rhizomes up so that each plant is separate, or in small clumps. This does require the cutting or breaking of the rhizomes, but this will not hurt the plant in the long run. This method produces the best-looking plants in my opinion. Even if you just have one plant per pot, they still look nice afterwards with no short, cut, damaged leaves. In favorable conditions, they will send up some new shoots quickly and look fairly nice. The main adult plant still looks nice and uniform after repotting as it has not been cut.  The best part of this propagation method is that you get exactly what you wanted. The plants have the same color and pattern as that of the parent.         

Some short varieties of Sansevieria trifasciata ‘Hahnii’. On left is the wild type coloration, the middle front has an all dark variety, and on the right is ‘Golden Hahnii.’ Photo by mrl2024.

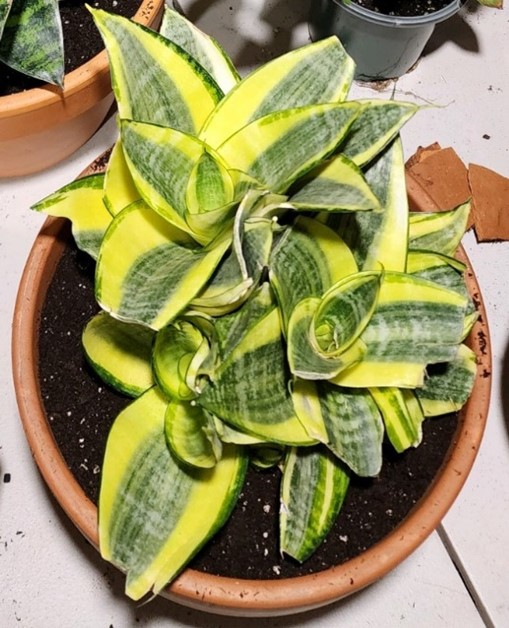
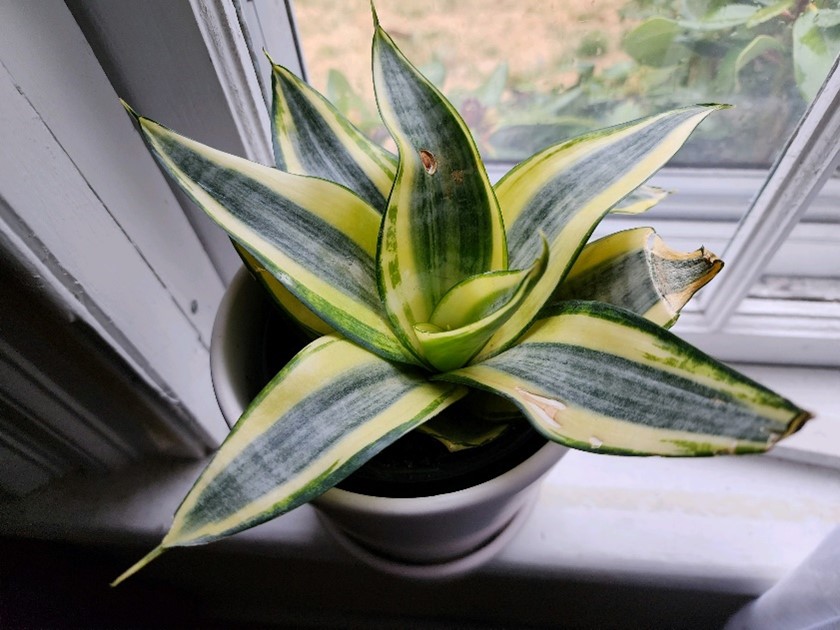
The Sansevieria group can be divided into two types, those with flat leaves and those with cylindrical leaves. Of those two groups, there are species/varieties that grow tall and some that grow short. The tall ones make great floor plants while the shorter ones do well when placed on a table. Most of us are familiar with the tall green snake plant with horizontal dark green stripes.  There is also a very similar one that has gold edges to each leaf. These have been around for many decades. There are some absolutely stunning new varieties on the market today that have selected for any of the colors found in these older varieties. For example, there is one called ‘Moonshine’, which has no pattern in the leaf at all, instead being pale green. Another interesting one is called ‘Hi Color’, which has more yellow than green in the leaves. The yellow is not simply along the margin, but found in the main area of the leaf as well. There are others that are selected for such a dark green that it almost approaches black in color. One of my new favorites is a different species called Sansevieria masoniana, commonly referred to as “whale tail,” “shark fin,” or some combination thereof. These can get up to 4 feet tall with proper growing conditions in a greenhouse, but generally smaller in a home setting. No matter which one you choose, you really cannot go wrong with these plants. They are readily available at most nurseries, garden centers, and home stores, so why not pick one or two up and brighten up your home?       

Matthew Lisy PhD

UConn Adjunct Professor

This is a fun time of year – sort of. Although cold and (normally) snowy outside, plant people are filled with joy and anticipation for the upcoming spring season. While ordering seeds can give us hope, we tend to like to get our hands dirty – literally. I find that this is a great time to propagate African violets. Yes, these plants can be somewhat challenging to keep long term; they are rather easy to propagate. I find that when propagating them, I tend to watch the adult plants more carefully and, therefore, they do better and last longer.

African violet in bloom. Photo by dmp2009.

Keeping African violets is rather easy if you follow a few simple ‘rules’. First, their potting medium needs to be fast draining. They will rot if the soil remains soggy for too long. This is best accomplished by either buying a potting medium designed for them, or simply adding some extra perlite to a regular houseplant mix. I have found that filling the saucer under the pot with water is the best way to hydrate the plants. Any water remaining after an hour or two can be discarded. Care should be taken to avoid getting water onto the leaves as this cause diseases.  This is another benefit of bottom watering as water is never being dumped on the leaves.

A regular, dilute (quarter strength) application of fertilizer with every watering works best for African violets, as opposed to periodic strong doses. These plants need bright light but will burn in direct sun. I have found them to thoroughly enjoy living under a table lamp. Although some specimens seem to hang on forever, to ensure a long-lived violet, they will generally need to be repotted once a year. This does not actually mean moving them to a larger pot, but just take them out of the pot and remove as much potting media as possible and replace it with fresh medium. Try and avoid too much damage to the roots, as this will hurt the plant. This freshens the rooting media by adding new nutrients, lessening media compaction and gets rid of any salts that may have accumulated on the media surface (a consequence of bottom watering).

If your house gets extremely dry during the winter, a pebble tray filled with water beneath the plant will help, as African violets like humidity. The air should move around the plant, as stagnant air leads to fungal infections that may result in death of the plant. Many people who collect African violets will use fans to move air across their growing tables in order to prevent fungal diseases.

Now that we have talked about how to keep violets, we can talk about how to propagate them.  This is my favorite part of working with these plants. I propagate a lot of different types of plants, but for some reason this is one of my favorite species to reproduce. The first thing you need is a very healthy and well hydrated parent plant. If the parent plant is not looking good due to lack of water, or has been growing in waterlogged soil recently, the propagation usually fails.  You will need a mature leaf from a healthy, adult plant. It should be free from any kind of injury, as this will be a pathway for disease organisms. By simply moving the leaf sideways, it should snap off the adult plant. I like to use a new, clean razor blade to trim the end of the leaf. The pros may use a hobby knife for the increased control and accuracy. Make a nice clean cut. Sometimes it is necessary to retrim the bottom of the leaf stalk after removing it from the plant. Next, dip the end that you just cut into some rooting hormone. The easiest to use, in my opinion, are the powder types, although there are some liquid formulations. The rooting hormone generally has some antifungal properties that help protect your plant during this process. Once this is done, you are ready to pot.

A young African Violet, propagated by the author, that is ready to be potted up. It is just starting to bloom for the first time. Photo by mrl2023.

Almost anything can be used to allow the leaf to grow babies, but I like to use small individual plastic pots. Rather than buying these, I use small plastic bathroom cups. You will need to poke a hole in the bottom for drainage. Do not make it too tiny as you want the water to drain quickly.  Use the same potting mix described above. I like to take a pencil and poke a hole in the mix.  This allows you to easily bury the stalk of the leaf, called the petiole, in the mix so that the blade is just above the surface. If the blade is touching the surface or below the surface, many times the leaf will rot before babies appear. As the leaf has no roots yet, care will need to be given to ensure it does not dry out. If you are only propagating a few plants, you could loosely place a sandwich bag over each cup. If you have a number of leaves you are propagating, then you could use a plant tray covered by a humidity dome. I prefer the taller kind with adjustable vents on the top and sides to allow some air movement.

Newly propagated African Violet leaves. Photo by mrl2023.

Plant cells are totipotent. What that means is that even though the cells have differentiated into specialize cells (like stem, leaf, root, etc.), they can de-differentiate and then grow into a whole new plant. This is different from animal cells where once they differentiate (specialize), they cannot go back. There are a few exceptions, of course, but it is beyond the scope of this article.  Scientists are trying to figure out how to make our cells do this so we can regrow limbs and organs. Anyway, back to our plants! The leaf cutting will end up sprouting roots, and eventually will grow new baby plants. Your one leaf may grow a new plant, but many times it grows a number of them. Once large enough to handle, you can separate these into their own pots.

A plant tray covered by a dome to increase humidity. Photo by mrl2023.

Care for your young violets is similar to the adults. Water when the surface is dry, but a bit more at the beginning before the roots form. Once the baby plants emerge from the soil, I start the diluted fertilizer regime. Don’t be too concerned at this stage with getting water on the baby leaves. For some reason, wet leaves do not seem to be a problem when the plants are young, but try to minimize this as a precaution. They should be placed in bright light out of direct sun.  Alternatively, you could place them under a lamp, or some fluorescent strip lights. Any of the new LED style lights meant for growing plants will work too, but the blue and red light will not show the true colors of the flowers. Daylight “colored” bulbs tend to show the flower colors the best.

Powered rooting hormone. Photo by mrl2023.

Once the baby plants get big enough and start to spread their leaves horizontally, remove the dome as the excess humidity will start to hinder their growth. I am going to say the plants are about one eighth to one quarter as big as the adults at this time, but you will need to use your judgement. Each home or growing area has its own set of environmental parameters. Once the plants are big enough, you can split them out into their own pots. You might want to use the small plastic cups again at this stage, and as the single plant gets bigger, move it up to progressively larger pots. Usually, most adult African violets end up in four-inch pots. I have seen some gigantic specimens in six-inch pots, but those are rare.

Hopefully this article inspires you to try your hand at propagating African violets. The best way to start is to go buy a nice looking one from a grocery store florist. These tend to be economical, but well cared for. A floral shop is also able to get some really nice, high quality plants if you desire. Many times, they will take requests for specific colors too. I find African violets make great birthday gifts. They are also nice to bring if someone invites you over for dinner, or just to pass around to family and friends for absolutely no reason at all. A word of caution, African violets are addicting. There is always another cool looking color or pattern to be had!

Happy Propagating!

Matt Lisy