Climbing and rambling roses are a beautiful addition to any garden, adding height and depth to your outdoor space. However, these types of roses require proper training and tying to ensure that they grow in the desired direction, produce the most blooms and don’t become tangled or unruly. Here’s a guide on how to tie climbing and rambling roses to get the best results.
MATERIALS NEEDED:
Twine or soft plant ties
Pruning shears
Garden glove
Support wire and tools to secure to a structure
Photo by Marie Woodward
1- Prepare you Roses
Prune your climbing and rambling roses to remove any dead or diseased wood and to encourage healthy growth. Cut back any wild or overly long shoots to create a manageable framework for tying.
2- Attach Straining Wires
If you’re training your roses against a wall or fence, attach horizontal strain wires to the structure, spacing them about 12-18 inches apart vertically and 5 feet apart horizontally. If you have a vinyl fence you can use vinyl safe hooks and secure the wire with a turnbuckle vertically, spacing them about two feet apart to avoid drilling holes in the vinyl material. (Vinyl fences are hollow and won’t readily hold a screw or nail).
Photo by Marie Woodward
3- Tie the Canes
Using twine or soft plant ties, attach the rose canes to the support structure at regular intervals, starting about 1.5 feet from the ground. Tie them securely but not too tightly. You want to allow room for the canes to grow and expand.
Photo by Marie Woodward
4- Train the Roses
As the roses grow, continue to tie the new shoots to the support structure, guiding them in the desired direction. For climbing roses, encourage lateral growth by tying the shoots horizontally or at a 45- degree angle. For rambling roses, allow the shoots to grow more freely, creating a looser, more natural look.
Photo by Marie Woodward
5- Maintain Your Roses
Regularly check your roses and adjust the ties as needed, ensuring that they remain secure but not too tight. Prune any wild or unruly shoots and remove any dead or diseased wood to keep your roses healthy and under control.
By following these steps and regularly maintaining your climbing and rambling roses, you’ll create a stunning vertical display that adds beauty and depth to your garden.
By Marie Woodward, UConn Home & Garden Education Center
On Wednesday, March 20, 2024, I had the privilege of joining the UConn Exhibiters at Connecticut Agriculture Day at the Capitol in Hartford, CT. This was my first time attending this event, and it was eye-opening. There were at least forty-five exhibitor tables, full of people from various sectors of agriculture, all on the main floor of the State Capitol. Each exhibitor represented a unique group of farm operators, producer associations, commercial vendors, non-profits, educational entities, and state/federal agencies that showcased their contributions to CT agriculture and spotlighted their services or offerings.
Exhibition table from CT Department of Agriculture. Beautifully made canvas and rolling screens spotlight CT agriculture. Cases of CT grown apples were handed out to the visitors.
Some offered information and support while others let you taste their locally grown/sourced amazing food products. Almost everyone was walking around with a pot of beautiful daffodils in their hands, reminding us that spring is here and it’s time to work in the gardens and farms. It was wonderful to see children’s lovely smiles while munching on Connecticut grown apples given out by the Department of Agriculture. Another exhibitor offered delicious soup to the participants, highlighting CT grown ingredients. Livestock folks had a spin wheel that relayed trivia questions to participants attempting to win some fun flavored milk. The diversity of information, delicious food, and engaging displays drew participants to exhibitor tables, making the event quite enjoyable while learning valuable facts about CT agriculture.
Dr. Kristen Govoni, Associate Dean of Academic Programs & Director of the Ratcliffe Hicks School of Agriculture, holding beautiful daffodils. Dean Chaubey and Associate Dean Amy Harder talking to an exhibitor.
In addition to families, gardeners and many others, a group of young energetic Future Farmers of America (FFA) students were busy learning from exhibitors while enjoying the ‘Mascot Madness’ competition. Dr. Wei Ren, Associate Professor from the Department of Natural Resources & the Environment, and I were showcasing Climate Smart Agriculture, which caught many FFA students’ interest.
Dr. Wen posing at our exhibition table that show cased Climate Smart Agriculture and Soil Nutrient Analysis Laboratory Extension Materials.
Students were especially interested to learn how climate change impacts agriculture, food safety, and really, every aspect of our lives. They were amazed to learn how choices for managing crops and soils can have such a huge impact on climate change and environment as well as the sustainability of soil and food production. They were intrigued to find out that their interest in agriculture could potentially make an impact on climate change and resilience of agriculture to climate change. The students told us this was one of the most inspiring events that they participated in. It was fun to talk to the students who are passionate about agriculture. Wei and I were also excited to talk about our research with the bright young minds, and conversed so much that we were getting hoarse by noon.
FFA students are excited to learn everything about agriculture, their passion for agriculture shines a light on the future of CT agriculture.
UConn CAHNR had exhibitor tables from a wide variety of programs, including Extension, IPM, Solid Ground, 4-H, CVMDL, Sustainable Poultry Production, Grown ConNECTed, CT Sea Grant, Urban and Community Forestry, EFNEP/SNAP-ED, Put Local On Your Tray. Along with Dean Chaubey who promoted UConn’s valuable programs and contributions to local agriculture was the Associate Dean of Extension, Dr. Amy Harder.
Visitors just flocked to some tables. I learned a lot from these exhibitors about not only what they do but, also ideas to bring more engaging activities and displays to our table. Wei and I would definitely like to participate in future Ag Days.
The Connecticut Ag Day at the Capitol is an annual event organized by Connecticut Agricultural Information Council (CAIC) and the Connecticut Department of Agriculture. It is typically held on the third Wednesday in March, according to CT Department of Ag. It is most certainly worth a day’s visit. It can be a fun family visit for children and their parents to learn and celebrate agriculture in CT, play fun games, and get some treats. You will walk out with a wealth of knowledge, full happy stomach, beautiful flowers, and fun giveaways.
Dr. Haiying Tao is an Assistant Professor and Soil Fertility Specialist in the UConn Department of Plant Science & Landscape Architecture.
Gardens in New England come to life in spring thanks, in large part, to bulbs! Spring bulbs are reliable, perennial color-bringers and seem equally at place in landscapes and containers. Daffodils (Narcissus spp.), grape hyacinth (Muscari spp.), and tulips (Tulipa spp.), are just some of the bulb plants that grace our gardens this time of year, and they remind us that the blooms of summer alliums aren’t far behind. While these plants might seem effortless to grow, they aren’t without their fair share of disease issues!
One common disease of bulbs we see here in Connecticut is Fusarium wilt and bulb rot.
Bulbs generally prefer average to loamy soil with good drainage. When planted in clay soils or following long periods of rain in early spring however, they are susceptible to rot diseases caused by fungal pathogens such as those in the genus Fusarium. The various wilt and rot diseases caused by Fusarium species can be destructive and sometimes difficult to control. Symptoms include wilting, brown lesions at and below the soil line, vascular discoloration, bulbs that are soft or spongey, and, especially with garlic (Allium sativum) and relatives, a purple-red discoloration of bulb tissue. Plants affected by this soil-borne fungal disease do not recover, so it’s wise to be proactive with management and prevention.
If your bulb plants do not emerge properly in the spring or emerge but wilt soon after, fail to flower, or display other symptoms associated with root rot diseases, pull them up and throw them away! Fusarium and similar fungal pathogens often survive the winter in the soil on diseased plant tissue from the year before, so it’s important to keep your garden clean and to not compost diseased plant tissue, as most home compost bins aren’t reaching temperatures necessary to kill pathogens. Fungi like Fusarium thrive in soggy soils, so do your best to prevent flooding and standing water where bulbs are planted. There are no fungicides that will completely control or eradicate Fusarium in a landscape, but some are helpful with preventing infection of healthy plants. Remember to always wear protective equipment and follow label rates and instructions if you choose to apply fungicides.
Purple streaking and weak root systems are symptoms associated with Fusarium rot. Ed Kurtz, budwood.org
Another common fungal disease of bulbs grown here in the Northeast is Botrytis gray mold or tulip fire. Fungi in the genus Botrytis cause disease symptoms on many different host plants. Though it is often called “gray mold” when associated with other plants, for tulips, the disease is usually called “tulip fire” due to the spots it causes on leaves and flowers, often with dark boarders resembling a burn.
Botrytis fungi are very common and are capable saprophytes, meaning they feed on dead or decaying tissue and contribute to nutrient cycling in the environment, but can be problematic in managed landscapes. To cause disease, Botrytis fungi must first colonize and get nutrients from dead or declining plant tissue, such as fading flower petals, over-ripened fruit. Once the fungus is established in its host plant, it becomes more aggressive and invades healthy plant parts, causing brown lesions and decay.
Symptoms of tulip fire, Botrytis tulipae, include leaf spots on leaves and flowers, often with dark boarders resembling burn injury, lending the common name. Sandra Jensen, Cornell University, Bugwood.org
To prevent Botrytis gray mold and tulip fire, try to encourage good airflow around your plants. Many people plant their bulbs closely together, like eggs in a carton, but this can make bulbs susceptible to tulip fire over time when treated as perennials. Dig up your tulips when they appear crowded, and each year when dealing with a potential disease issue. Inspect bulbs before you plant them again, and discard bulbs that are not firm, discolored, or otherwise do not appear healthy. Rotate to new locations and avoid planting consecutively in the same spot if there has been a history of disease there.
If you have questions about growing bulb plants, are dealing with a plant health issue, or regarding other gardening topics, feel free to contact us, toll-free, at the UConn Home & Garden Education Center by emailing ladybug@uconn.edu. You can also call us at (877) 486-6271, visit our website at www.homegarden.cahnr.uconn.edu, or contact your local Cooperative Extension center.
Dr. Nick Goltz, UConn Home & Garden Education Center; Plant Diagnostic Lab. This article was originally published in The Chronicle
In spring, gardeners will be starting to seek out materials like mulch, stone, compost and topsoil as a foundation or as a finishing touch for many projects. These materials can be sold in bags or as a bulk product. While the difference between the two may seem obvious, a gardener may select bagged or bulk materials based on many factors surrounding the project they are planning out.
Mulch in bags can be easier for small scale applications. Photo by H. Zidack
Bagged materials are pre-measured and can be useful in multiple applications. Consumers can purchase topsoil, mulch, stone, soilless media, and other components of soil structure to amend their planting beds to their needs. Bags are often used for smaller scale solutions. Bagged materials are commonly sold in units of cubic feet, which conveniently fit into the trunk of a car for easy transport. Their packaging can allow for protection against contaminants or pathogens while it is being shipped and stored. Additionally, bagged materials can often include pre-measured additives like fertilizer, moisture control materials, or other materials to make its contents appropriate for its intended use.
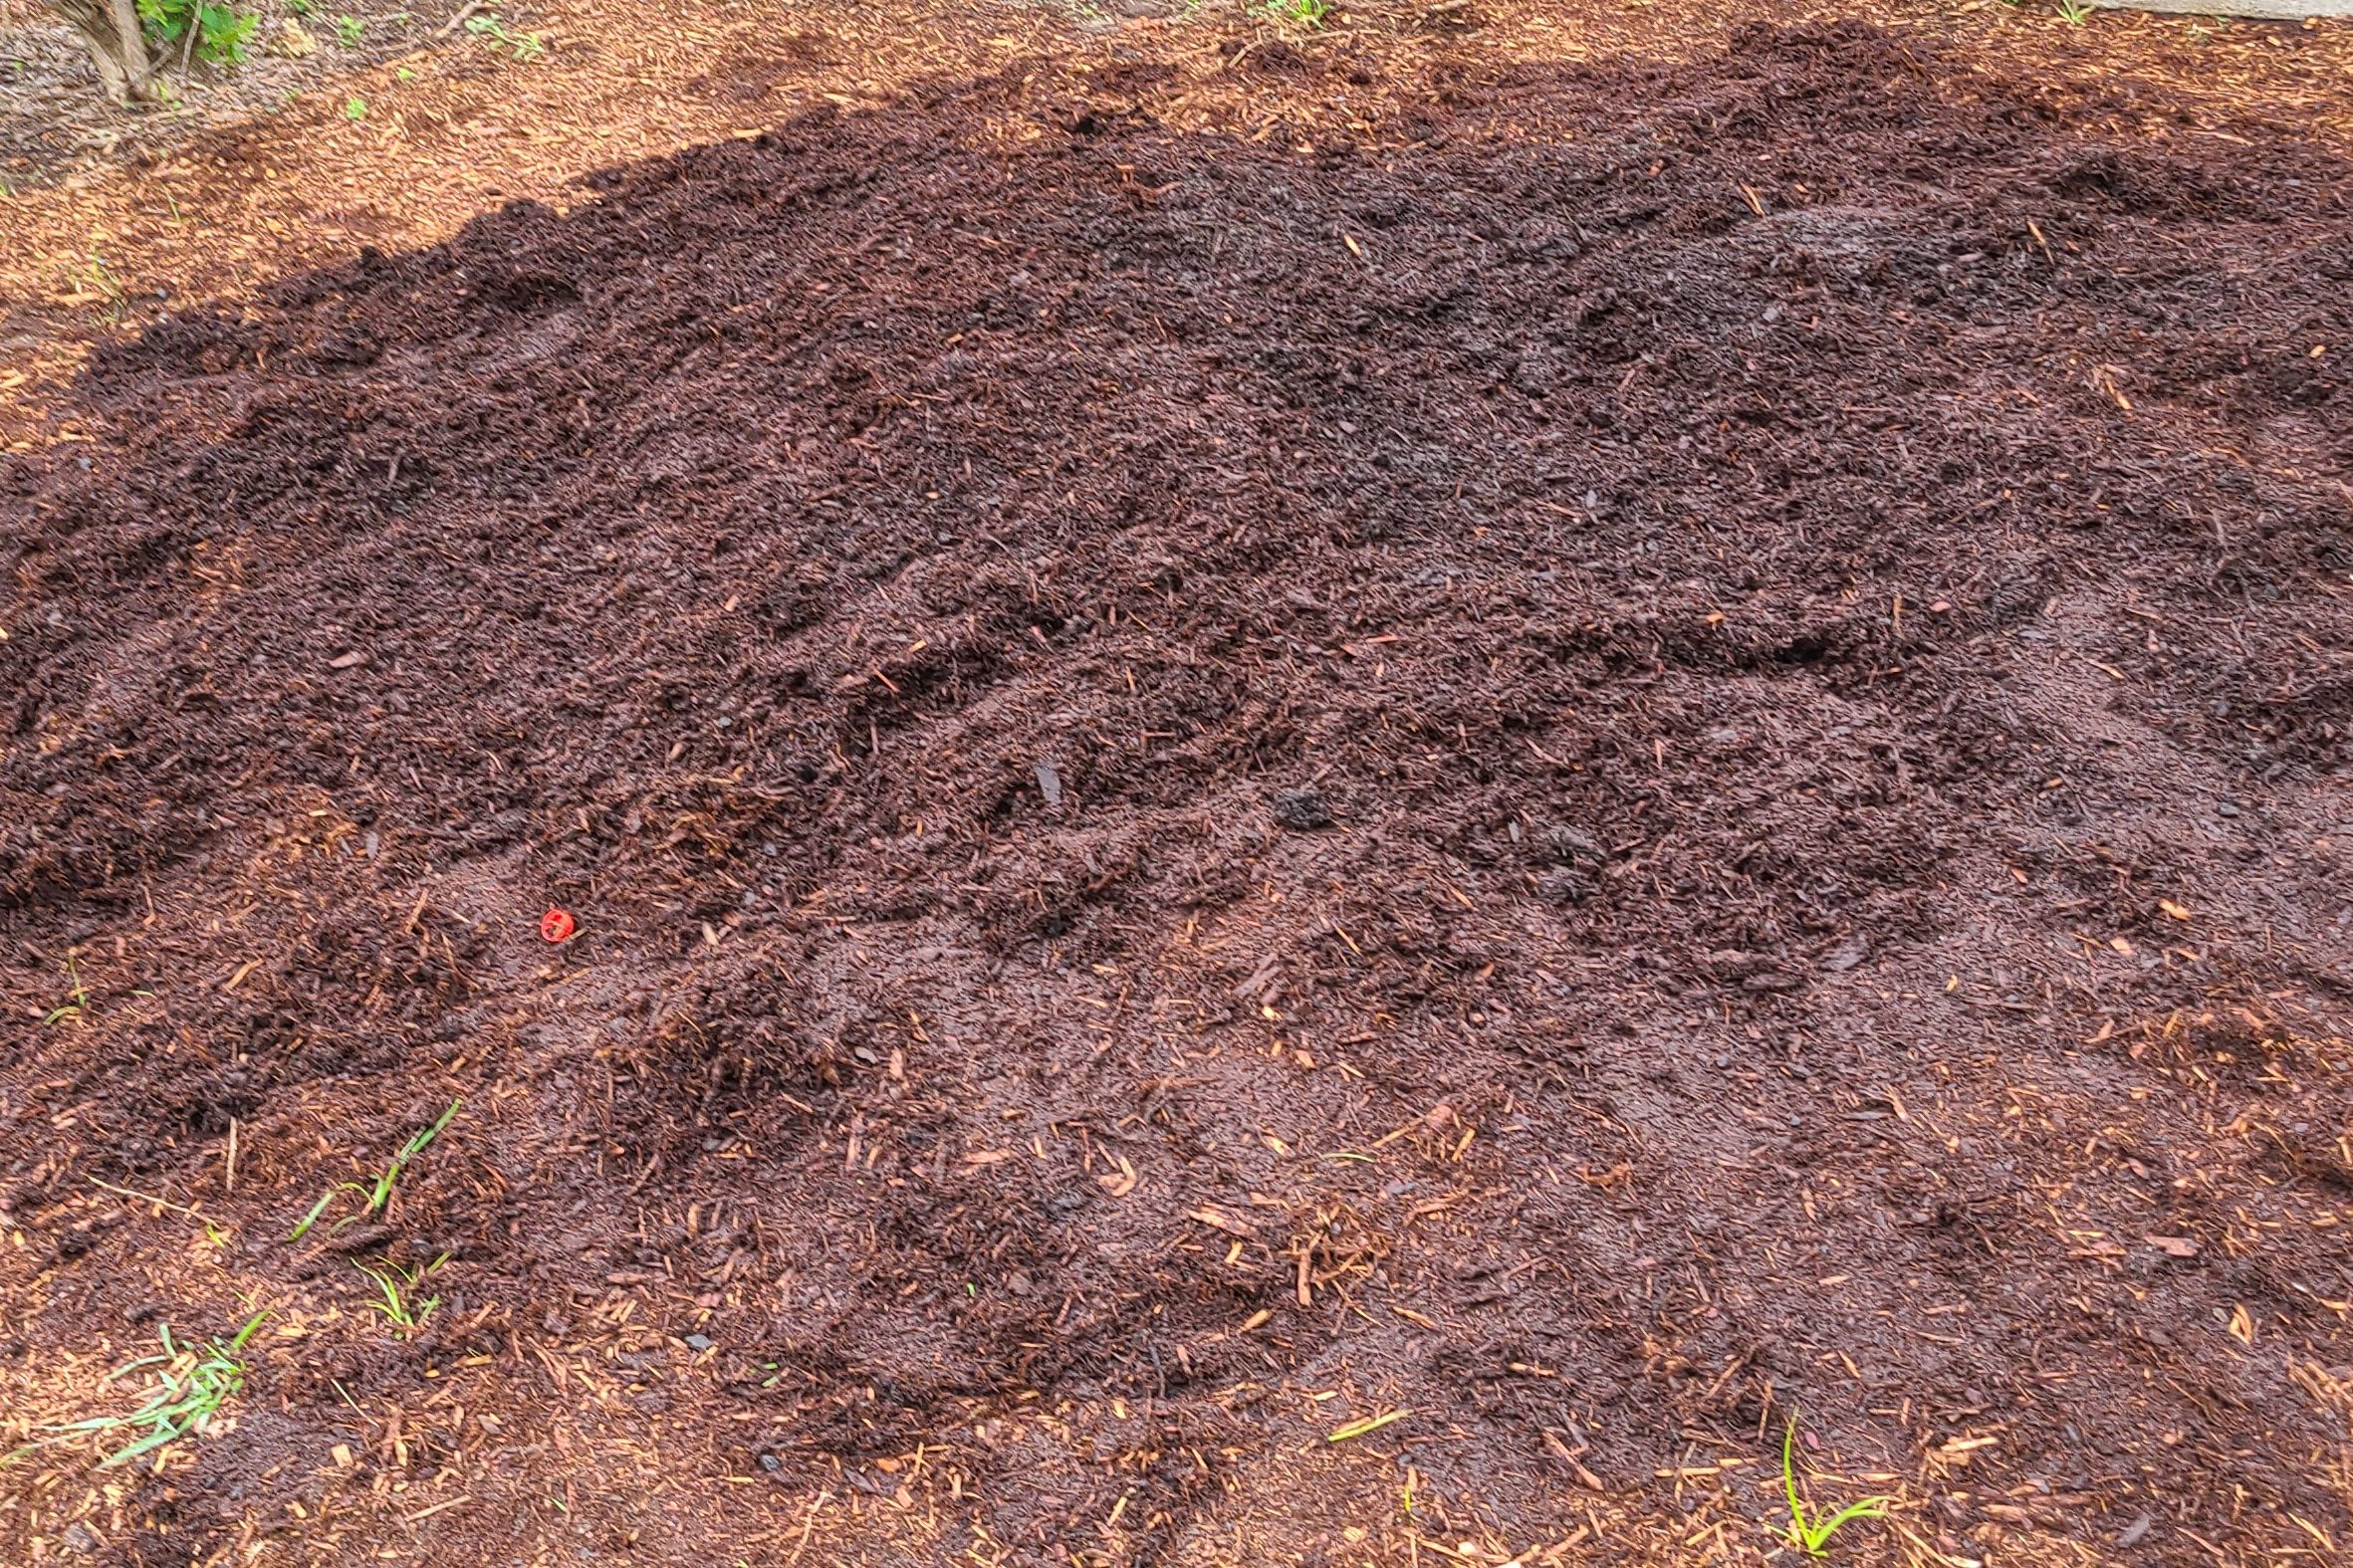
Bulk mulch deliveries will leave a pile in a designated area of your property. Photo by H.Zidack
Bulk materials can provide consumers with an opportunity to purchase larger quantities of material without the cost of packaging and disposable plastics. These applications are great for filling raised beds, mulching large areas, or replacing eroded soil. Gardeners can inspect the material, check the soil texture or color of the mulch, at the landscape center and, for an added fee, have it delivered to their home.
Basic algebra will help calculate how much material is needed for a project. Follow along with the example below to see how to calculate the exact quantity to purchase for your projects this spring:
Doing the Calculations
1. Using a measuring wheel or tape measure, measure and calculate the area of the space you want to mulch (length x width)
10ft x 10ft = 100 ft2
2. Multiply the area of your space by the depth of new material you want to add. For mulch, 3 inches is a common thickness to help prevent weeds, hold moisture and regulate temperature within the planting bed.
Remember it’s important to keep units the same. To keep this consistency, the example below, (inches), will be represented as 1/12th of a foot.
100ft2 x (3/12) ft = 25 ft3
3. Decide how you want to purchase your product and calculate what to buy.
3a.For Bagged Materials
Divide your cubic feet by the size of the bags you are considering purchasing (Most bags come in 1, 2 or 3 cubic feet)
Example: Purchasing bags that are 2 cubic ft in size
25 ft3 / 2 ft3 = 12.5 2CF Bags
*Round up to make sure you have enough material for complete coverage. Excess should be minimal.
3b.For Bulk Materials
Divide your cubic feet by 27 to discover how many cubic yards you need.
25 ft3 / 27 ft3 = 0.92 Cubic Yards
*Round up or down based on your overall gardening needs keeping in mind that materials are usually sold by the quarter, or half, or full yard.
If you’re intimidated by the math, don’t worry! The University of Maine has a good resource page that has further simplified these calculations. If we check the work we did against it, their recommendation will match at just less than one yard.
Lastly, consider how you want to complete your project. Do you want to save money? You may have to do more calculator work to figure out what kind of savings you are getting by using one instead of the other. Is this project on a deadline or do you want to spend less time running back and forth from the garden center? A delivery of bulk material would be your best bet. Would you need to rent a pickup truck? Does a pile of mulch in your driveway sound overwhelming and would you rather break your project up into manageable chunks? There is a lot to consider!
Whatever you decide, remember to use safe lifting techniques, stay hydrated, give yourself breaks, and know that the bottom of that pile gets closer with every shovel full!
By Heather Zidack, UConn Home & Garden Education Center
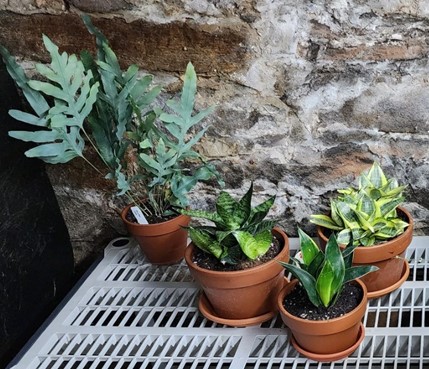
The Sansevieria group makes up some of my favorite houseplants. Scientists recently placed them in the genus Dracaena, but its former scientific name seems to also be one of its common names. I will continue to refer to it as Sansevieria in this article to avoid confusion. In the future, you will most likely see the plant tags that come with plants offered for sale finally catch up with this change in the scientific community. This plant has many common names including “snake plant” and my personal favorite “mother-in-law’s tongue”. Like many varieties of houseplant, there are some staples that have been around for decades, some newer species that have come to market, and some really interesting cultivars or hybrids of all of them.
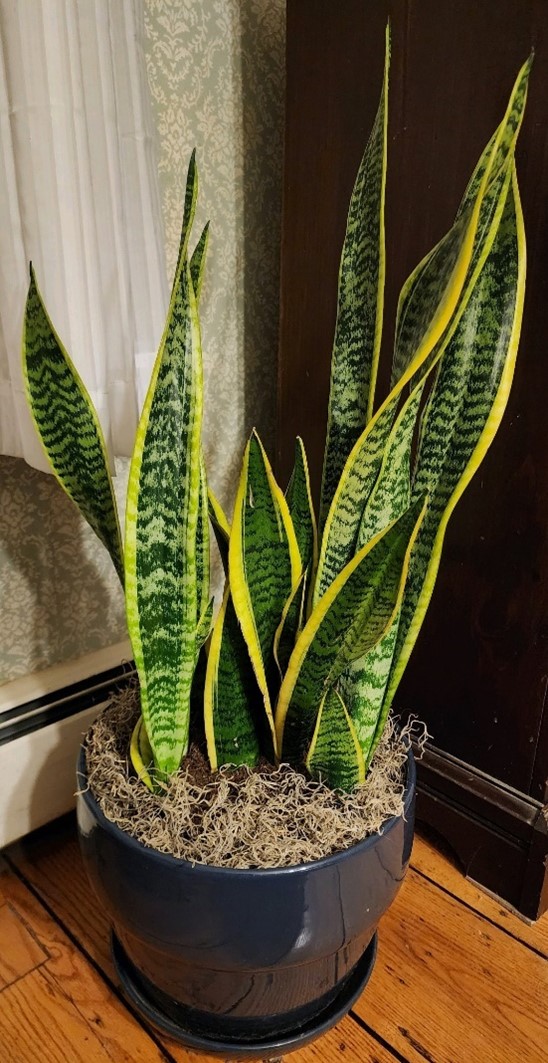
A tall variety of Sansevieria trifasciata with gold edges. Photo by mrl2024.
These plants have a rhizome, and the leaves grow from the base of your pot. They are very prolific when they like their environment. In fact, they tend to break the pots they are in, so I would recommend using plastic pots, which their growth will eventually deform. If you want to use a clay or ceramic pot, I suggest putting them in a slightly smaller plastic pot, then putting that in the clay pot. You can hide the gap between the two pots with Spanish moss. Being native to Africa, they cannot tolerate cold temperatures. Typical household temperatures work well, but avoid anything below 55 degrees F. If kept too cold, they will die and rot from the base up. By the time you notice there is a problem, it is too late to do anything about it. Another thing that is nice for the plant collector is that their upright growth habit allows the grower to have many varieties in a small space.
Overwatering is the quickest way to kill any houseplant, but especially so with these. In the winter, you probably only want to water once a month, and sparingly at that. Do not let them get soggy or this otherwise hardy plant will rot. In the warmer months when the plant is actively growing, allow the soil to dry between waterings, but then water more liberally. Some growers will add extra perlite to the mix to aid in drainage. I have not had trouble keeping them in a standard mix, but you certainly need to be careful with watering. Choose the mix that will work best for your plant hydration habits. These plants have the reputation of being a low light plant, which they certainly can handle. Sometimes, however, people place them in the darkest corner of a room where they hang on for a few months, but then eventually run out of stored resources and die. Remember they do need some light to photosynthesize so bright indirect light is best. The other problem I have seen is their unique, flat leaves can become covered in dust. Either dust them manually, use a blower, or take them outside in warm weather and hose them off. A damp cloth run gently over the leaves is probably the easiest method, but becomes more difficult and time consuming with a rather large collection.
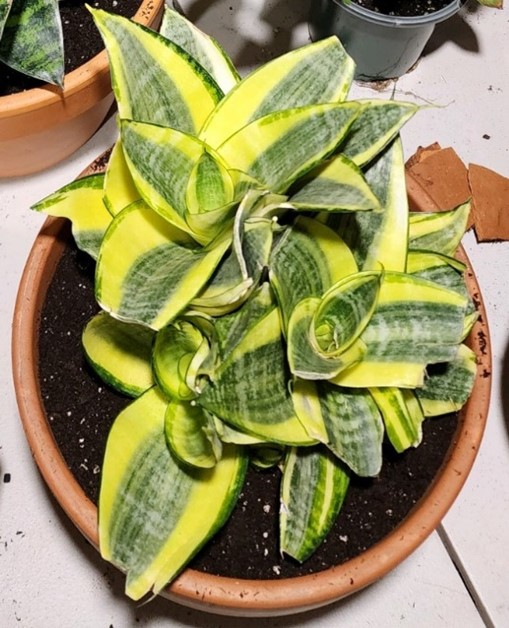
Sansevieria trifasciata ‘Golden Hahnii’ before (top) and after (bottom) division and repotting. Here, each baby plant got its own pot. Photo by mrl2024.
All varieties of Sansevieria are fairly easy to propagate. If you want more plants quicker, you can take leaf cuttings. You either dip in rooting hormone and replant, or you can place the cuttings in water to take root (change the water daily for best results). You must be careful with the orientation, as you want to plant the bottom side of the cutting into the soil, not the top, which will fail to root. It is easy to get confused and forget which end is up. Some people put a mark on the top or bottom, others cut in such a way as to indicate the bottom. It really doesn’t matter which method you choose, if any, as long as the cuttings are oriented properly at planting time. There is one big problem with using cuttings – the babies will look like the standard green variety, and not have any of the nice golden edges, so be careful with this method. I also don’t like doing this as it, in my opinion, just looks unsightly. The remaining stub on the parent plant looks awful. If I was to do this, I would recommend cutting near the base of the plant by the soil surface. The cut leaf will not regrow, and instead just will look damaged. In the new pot where the cutting was placed, you still have to look at the cutting as it does not grow. It is not until the baby plants growing from the base are big enough that you can separate it from this actual cutting piece.
My favorite way to propagate these plants is to let them grow, and then divide them during repotting. You simply pull the plant out of the pot and divide the rhizomes up so that each plant is separate, or in small clumps. This does require the cutting or breaking of the rhizomes, but this will not hurt the plant in the long run. This method produces the best-looking plants in my opinion. Even if you just have one plant per pot, they still look nice afterwards with no short, cut, damaged leaves. In favorable conditions, they will send up some new shoots quickly and look fairly nice. The main adult plant still looks nice and uniform after repotting as it has not been cut. The best part of this propagation method is that you get exactly what you wanted. The plants have the same color and pattern as that of the parent.
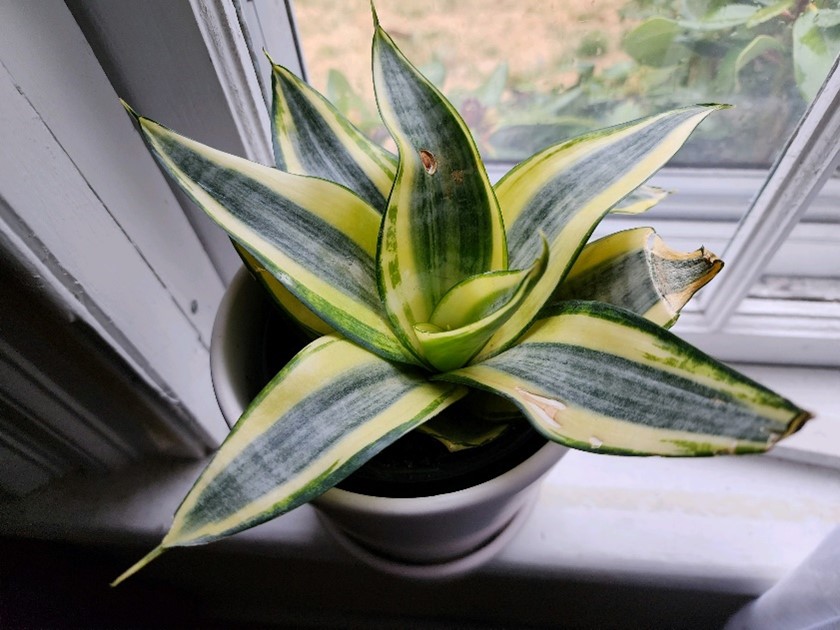
Some short varieties of Sansevieria trifasciata ‘Hahnii’. On left is the wild type coloration, the middle front has an all dark variety, and on the right is ‘Golden Hahnii.’ Photo by mrl2024.
The Sansevieria group can be divided into two types, those with flat leaves and those with cylindrical leaves. Of those two groups, there are species/varieties that grow tall and some that grow short. The tall ones make great floor plants while the shorter ones do well when placed on a table. Most of us are familiar with the tall green snake plant with horizontal dark green stripes. There is also a very similar one that has gold edges to each leaf. These have been around for many decades. There are some absolutely stunning new varieties on the market today that have selected for any of the colors found in these older varieties. For example, there is one called ‘Moonshine’, which has no pattern in the leaf at all, instead being pale green. Another interesting one is called ‘Hi Color’, which has more yellow than green in the leaves. The yellow is not simply along the margin, but found in the main area of the leaf as well. There are others that are selected for such a dark green that it almost approaches black in color. One of my new favorites is a different species called Sansevieria masoniana, commonly referred to as “whale tail,” “shark fin,” or some combination thereof. These can get up to 4 feet tall with proper growing conditions in a greenhouse, but generally smaller in a home setting. No matter which one you choose, you really cannot go wrong with these plants. They are readily available at most nurseries, garden centers, and home stores, so why not pick one or two up and brighten up your home?
This past March 9 – 11, I joined a bus tour coordinated by the CT Horticultural Society and lead by Nancy Dubrule that was headed down to the Philadelphia Flower Show. This is the longest running and largest horticultural event in the nation, now in its 195th year! Held in the PA Convention Center and put on by the Pennsylvania Horticultural Society, there are just awe-inspiring landscapes and floral displays by designers from near and far.
Entrance floral display at the 2024 Philadelphia Flower Show. Photo by dmp2024.
This year’s theme was United by Flowers. There were so many beautiful and creative landscapes, arrangements, floral designs, and even floral craft items, it was hard to pick favorites. A very unique one was a map of the United States with different colored flowers depicting the gradations of the new U. S. hardiness zone map. A bright red sports car just invites one to hit the road.
A Floral Atlas of America by Gloucester County florists at Jennifer Designs. Photo by dmp2024.
Best in Show Landscape trophy went to Apiary Studio for their large landscape display ‘Right of Way’. As you can see, this design depicts highway roadsides as a unifier of Americans. Many of us enjoy the views, hopefully from the passenger seat, when traveling down both highways and backroads. Of course, some of the views are better than others. Apiary Studios envisions the roadsides as a green throughway uniting remnant land across the country plus especially with a little help can serve as habitats for many beneficial creatures.
Right of Way by Apiary Studio. Photo by dmp2024
On the way down to Philadelphia, our bus tour stopped at the New York Botanical Garden to take in their Orchid Show, which will continue through April 21st. Held in the Enid A Haupt Conservatory, this year’s theme was Florals in Fashion and is described as ‘a fashion inspired celebration of all things orchid”. Not only were there more orchids in bloom than I had ever seen at one place, but three female designers added magical and whimsical mannequin displays amid the glorious and colorful parade of blooming orchids.
Florals in Fashion design at NYBG by Olivia Chang. Photo by dmp2024.
This was my favorite by Olivia Chang of Dauphinette. Creatively attired mannequins are surrounded by lush foliage, falling water and a riot of orchids.
Kristen Alpaugh of FLWR PSTL created this design with a red billowing ribbon and her trademark iridescent painted botanicals. Named Regina, she is supposed to embody different versions of ourselves. The painted leaves were quite eye-catching.
Regina by Kristen Alpaugh. Photo by dmp2024
The third designer, Hillary Taylor, used her creativity to adorn a number of mannequins in orchids and other complementary plants. This one, Horti Couture, wears a lovely dress of phalaenopsis orchids and purple variegated spider worts. It looks fluid and flowing. These floral fashion creations were clever and appealing but just seeing so many species of orchids in full bloom would make a visit this time of year worthwhile.
Horti Couture by Hillary Taylor. Photo by dmp2024
Before the bus brought us back to Connecticut, we had a few hours at Longwood Gardens, the sprawling, exceptionally manicured estate of Pierre S. du Pont. Originally it was the Peirce family arboretum and planted with both native and exotic trees. Purchased by du Pont in 1906, he developed outdoor gardens, water features and an elegant conservatory over the years. The garden was opened to the public in 1921 and in the 1930s, a foundation was started to support the gardens and performing arts offerings at Longwood.
Conservatory at Longwood. Photo by dmp2024
Longwood Gardens expanded over the years and is now one of the premier horticultural destinations in the U.S. Open year-round, there are both indoor and outdoor landscapes and exhibits, and a focus on conservation, plant collections, plant research, education as well as numerous performing arts venues.
Conservatory at Longwood. Look at that lush lawn. Photo by dmp2024
The day we were there it was extremely windy and bitter outside but inside the conservatory it was bright and warm, and the smell of spring was in the air, along with the fragrance of freesias. The plantings inside the conservatory were amazing. Each aisle a different color. Down one were peach amaryllis and orange freesias.
Peach amaryllis and orange freesias. Photo by dmp2024
Down another were pink lilies and the shortest rose-colored hydrangeas I have ever seen. Every turn was a delight from the green walled bathrooms to the blue poppy to the pipe organ. It would be great to go back during the growing season when the gardens outside will be as spectacular as the ones inside. On that note of wistful thinking, I saw this entry using dried florals at the Philadelphia Flower Show.
Native Eastern redbud Cercis canadensis flowers before leaves appear in early spring
Daffodils, That come before the swallow dares, and take The winds of March with beauty.” — William Shakespeare
Native red maple Acer rubrum
In late March there are signs that spring is here. Snow is usually gone, and although no leaves have appeared on our deciduous trees and shrubs, there may be flowers that will provide early bees with their first meal of the year. Red maples bloom early and provide food for many pollinators like flies, bees and beetles that are just emerging in the spring. While some native plants flowering coincides with native bee activity, there are also non- native plants that can be of great value to early pollinators.
Skunk cabbages produce heat and appear through the snow in February
Skunk cabbages are our first native bloomers. They can arise in wetlands when snow still covers the ground. Honeybees, native bees, some moths and flies visit these putrid flowers as early as late February and then into March.
Honeybee on skunk cabbage flower
One of the first harbingers of spring is the appearance of native Colletes inaequalis ground-nesting bees which can be seen visiting the first flowers of spring. Look for them on native and non- native ornamental willow flowers in late March, and soon after that on native bloodroot.
Native bloodroot
Non-native Japanese andromeda shrubs, Pieris japonica, can bloom as early as late February and can be an important food source for bees that appear before native willows bloom. There are many varieties, some tall and others more compact and they may have white, red or bicolored, drooping, urnlike flowers. They do best in sunny locations with afternoon shade.
Red flower variety of Japanese andromeda
Native bloodroot can form small colonies on sunny woodland edges, and their bright white flowers are often the highlight of the still monochromatic landscape. Flowers open on sunny days and close by night.
Common bluets, commonly called Quaker ladies Houstonia caerulea, are small, blue native wildflowers with four petals and a distinctive yellow center. Many bee species, butterflies and syrphid and other flies visit these low- growing plants for nectar and pollen. They can appear as early as late March, depending upon the temperatures. Flowering can last into early July.
Native bluets
Native red or purple trillium Trillium erectum appears a little after bloodroot, and supports certain moths, bees and flies. Look for it in dry woodland areas with highly acidic soils where there is some sun, especially where there are mountain laurels. It often is found where there are ramps and bloodroot.
Native purple trillium
Trailing arbutus and round- lobed hepatica are native wildflowers of open woodlands. They are uncommon, or perhaps seem so because they are found in very small areas with specific soil and other site conditions. Pollinators are flies and specialist native bees.
Trailing arbutus
Native twinleaf Jeffersonia diphylla produces its bloodroot-like white flowers as early as March and as late as June. A single flower arises on a leafless stalk above the peculiar joined leaves that resemble wings. These flowers attract bees, especially specialized foragers.
Twinleaf
Currants, especially the extremely fragrant clove currant, plus josta berry, a cross between currant and gooseberry, are favorites of bumblebees and other native bees. The clove currant fragrance must be what the island of Zanzibar smalls like as travellers approach it by boat.
Clove currant flowers
Dwarf ginseng Panax trifolius L. is a native woodland wildflower that is only 4-8 inches tall. The airy cluster of small flowers appear in early to late spring and since plants grow in the duff of woodlands, the flower heads, although very small, can help find these little plants.
Dwarf ginseng
Among the non-native flowering shrubs that support native pollinators is the Rhododendron mucronulatum ‘Cornell Pink’. This plant blooms in early April before the leaves appear. Many native bees including Osmia spp., Colletes inaequalis and Bombus spp. and wasps visit the flowers. Cornus mas, or Cornelian cherry, is a non-native shrub or small tree whose flowers line the branches before the leaves appear.
“Cornell Pink’ Rhododendron muconulatum Non-native Cornus mas
Ornamental plants like violas and pansies also attract spring pollinators, and dandelions have a great pollen source for spring and summer bees alike.
Tiny bee covered with dandelion pollen
Native Amelanchier, also called shadbush and serviceberry blooms in April and attracts many bees and other pollinators. Its delicate racems of white flowers can be profuse and stand out as leaves are not fully expanded. Many specialized bees are supported by this small tree or multithemed shrub.
Amelanchier spp.
Star magnolias, Magnolia stellata, bloom in April before leaves are out. These trees support many pollinator species and butterflies like spring azures and tiger swallowtails that are out in early spring.
Star magnolia
There are many other plants for pollinators in early spring- daffodils, crocus, currants to name a few. As I hike around at this time of year, I take note of which flowers the most pollinators are attracted to, and I may decide to add some of these to my own gardens. I also stop to enjoy all the new colors and textures coming into the landscape. I appreciate Algernon Charles Swinburne’s comment-
There are a few different ways that people keep houseplants. Some people place the plants in their homes, and then leave them there permanently. For others, the houseplants are simply overwintering in the house, but their true home is outdoors. I tend to be the second type. This type of behavior leads to some problems, the worst being where do you put all the plants in the winter. For temporary housing, it is difficult to ensure the plants have adequate light, water, and temperature. It is fairly easy to water the plants, and with the copious amounts of LED fixtures on the market today, light is no longer that difficult either. Temperature, however, can be a bit tricky and potentially expensive.
I like to put my plants in the basement for the winter. It is easy to maintain them, and if I spill a little water it doesn’t really matter. Normally, it is best to keep tropical houseplants above 50 degrees F, but 60 F is even better. My basement is generally in that range, but with the severe cold spells we have had this winter, the temperatures have dropped into the upper 40s. The other important thing to remember is that heat rises. The floor of the basement can be as much as ten degrees colder than shoulder height on a human. There can be pockets of cold that pool in areas imperceptible to us. There are a number of solutions to all these problems, but that is beyond the scope of this blog. I brought my houseplant collection in and due to the cold spells completed an unintentional experiment! I will discuss the results here in hopes that others can learn from my misfortune.
First of all, it is important to realize that each species will have its own temperature preferences. It is not uncommon for one species to be able to tolerate the cold, and yet another closely related species will not. In the field of Ecology, there is a well know optimal zone that our houseplants prefer. These are temperatures from about 60 to 90 degrees F. Now, not all houseplants fit this zone, but I am generalizing for the purposes of this discussion. Outside of this range, are the zones of stress. The plants may still live in this range for a short period of time, but this is not ideal or preferable. For example, let’s say on the cold side we go down to 50 degrees, and on the warm side 100 degrees F. Beyond the zones of stress are the zones of intolerance. This is where the temperatures are too extreme and the plants cannot live. In my fictious but somewhat realistic example, let’s say below 50 and above 100 degrees F. Plants usually don’t immediately die, but could suffer leaf drops or dying leaves.
The rare and beautiful Philodendron ‘Silver Stripe’ does not seem to mind the cold one bit. Photo by mrl2023.
There are many reasons plants cannot live outside of a certain temperature range. For one thing, if it gets too cold and the tropical plants are subject to freezing that really needs no explanation. On the other end, too hot and they may desiccate, or dry out faster than they can replenish the water. Afterall, they are in a relatively small pot with limited moisture. Beyond that, one of the greatest obstacles for our plants (and everything else) boils down to chemistry. Living organisms are full of all sorts of chemicals that undergo reactions. If our enzymes that make these reactions happen faster and with less energy are subject to temperatures beyond their ideal range, they may denature, or change shape, in a way that makes them unusable. Think of breaking your house key, and then trying to use the remaining piece to unlock your door – it won’t work! So, for our houseplants, even though they are not subject to extreme hot or cold, temperatures outside their ideal range may not allow them to live because the chemical reactions necessary to maintain themselves simply do not work. For some, this process happens quickly, but for other species, it is a slower process. Each species has a different tolerance level.
The groups of mostly tropical houseplants I will discuss here are by no means an exhaustive list. These are simply a group of plants that were subject to the cold basement temperatures during some of our cold spells. For plants in the rest of my house, they were all fine. I heat the house to a nice toasty 55 degrees F but have supplemental heat in the areas we occupy often. That 55 degrees F seems to be a comfortable minimum threshold for most houseplants. Be careful not to over water in cold temperatures as that easily leads to rot and subsequent death!
Cacti and succulents have the most cold hardiness. I have kept this group of plants in cold basements for years without any issues. It is important to give them just a little bit of water. These plants are not usually growing at these temperatures, but rather sort of ‘chilling out’. They will resume active growth when placed outside next spring, or when the basement warms up provided there is adequate light. I know a number of cacti and succulent collectors that have simple hoop houses outside with two or three layers of plastic that are heated to a max of 50 degrees F with no troubles. I would advise doing your own research for your specific species of plants should you desire to embark down this path.
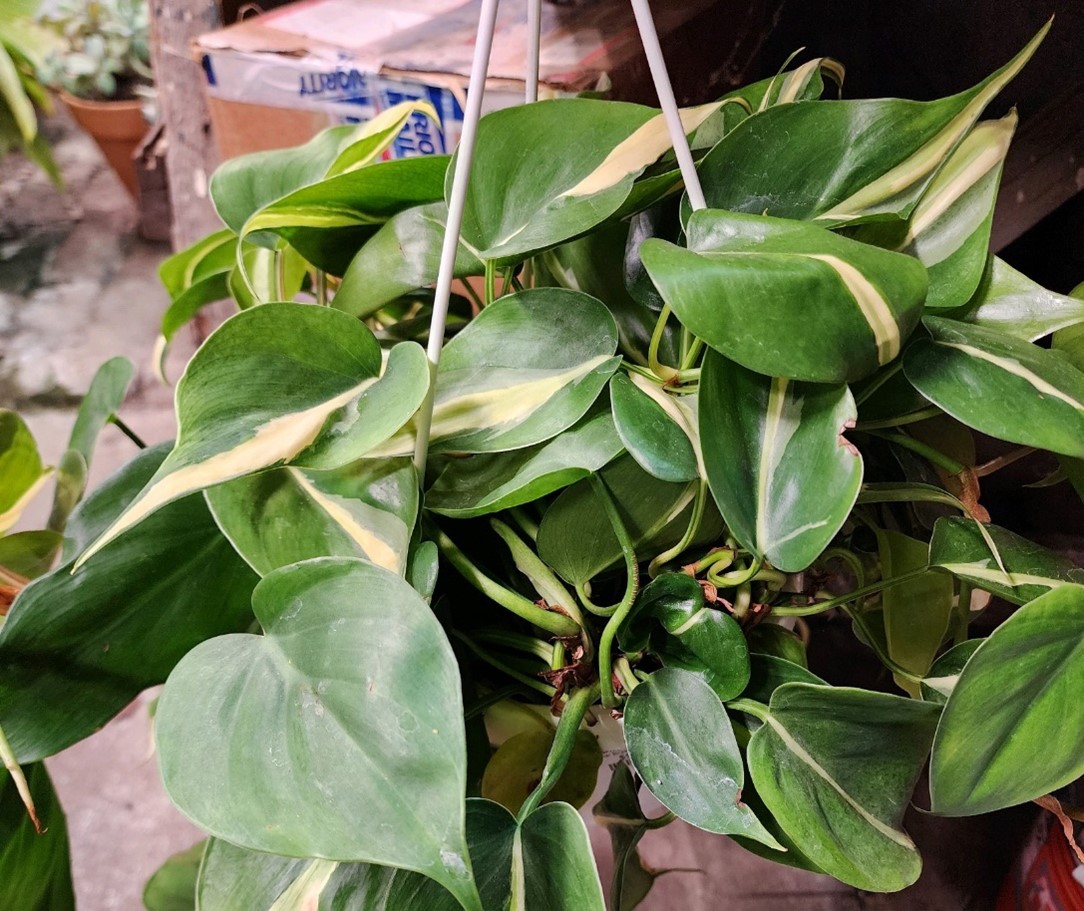
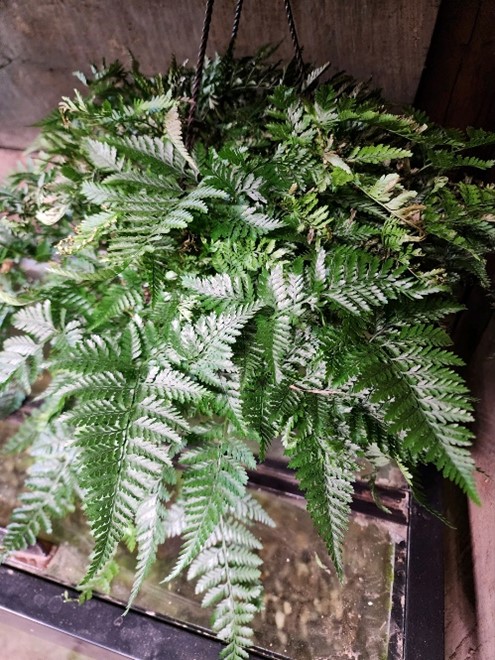
The Gesneriads, of which I am so fond, love cool basements. This group includes African Violets and Cape Primroses. They actually prefer these cooler temperatures, but will suffer in warmer summer months. Pothos also seems rather tolerant of the cold temperatures, although their leaves seem a little droopy. One exception here is the Scindapus treubii ‘Moonlight,’ which died almost immediately. The Philodendrons are a real mixed bag. Any of the larger-leaved floor plants seemed to die almost immediately even at the 50-degree mark. The Philodendron “Pink Princess” and similar types seemed to tolerate the cold up until about February, and now are showing signs of extreme stress. These I am going to move! The hanging basket species, with the exception of the ‘Micans’, seem to be looking fabulous in the cold and not even bothered at all. All of my ferns do not seem to mind one bit either. All of the Calathea and Sansevieria species are struggling or dying. The always raved about ZZ plants (Zamioculcas zamiifolia) both died almost immediately in the cold temperatures as well. I had both the green and black varieties. The last plants I will comment about are the Poinsettias. These are difficult to grow due to their sensitivity to temperature, specifically cold. I once had the greenhouse heat stop working one evening. I discovered this the next day and many of the plants dropped their leaves. Even buying them at the store and walking out to the car can result in dropped leaves. If possible, these should be wrapped before leaving the store. Most other houseplants can tolerate the trip home in a cold car, but try to buy them on your way home so they don’t spend too much time in the car.
The Rabbit’s Foot Fern, along with all the ferns in my collection, are not harmed by cold spells. Photo by mrl2023.
Well hopefully my little unintentional experiment with the cold will help people decide where to overwinter their houseplants. I may need to heat that space slightly in future years if I decide to move some of those sensitive plants into that location for the winter. To avoid the coldness of the floor, a board placed on cinder blocks can provide some protection, as can an overturned flower pot underneath the one in which the plant is growing. Isn’t it wonderful knowing that Spring is just around the corner?
While there’s always the traditional Valentine’s Day gifts of flowers and candy, why not give that special someone a plant with heart-shaped leaves that will likely last much longer than chocolates or bouquets. There are actually a number of plant species to choose from with some being quite easy to grow.
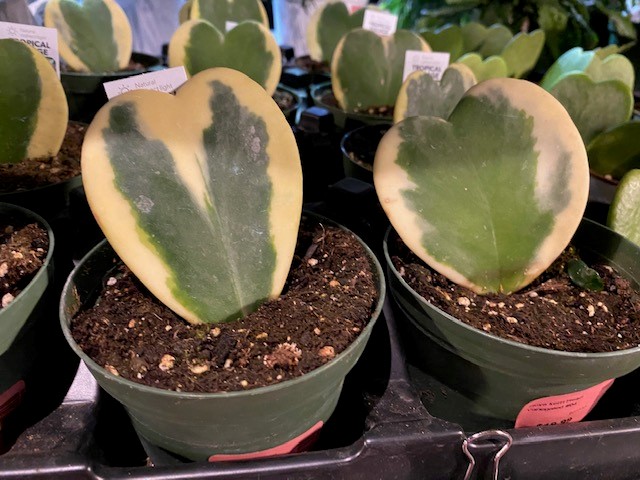
Perhaps the cutest, as well as the easiest is the Sweetheart hoya (Hoya kerrii). Hoyas are a very slow growing, vining plant with stems that may reach 13 feet in length. Typically, it is grown in a wreath form or on a trellis. The pink or white flowers are fragrant but not produced in great abundance.
While this plant has the most adorable heart-shaped leaves, the ones that are sold as a single leaf in a pot will, in most cases, remain as a single leaf. Unless a piece of stem was left attached to the potted leaf, the plant is not able to initiate new leaf or stem formation. This makes for a simple plant to care for, however. Keep your Sweetheart hoya leaf in a bright sunny spot with temperatures in the 60 to 80 degree F range and water when dry.
Hoya heart-shaped leaves. Photo by dmp.
Another plant for small spaces with charming marbled, heart-shaped leaves is the String of Hearts (Ceropegia woodii). While the dainty individual stems can grow 12 feet long, they can be trimmed to keep the plant compact. The grey-green leaves are small, only about ½ inch in diameter. String of Hearts is a succulent best grown in a potting mix labeled for cacti and set in bright, filtered sunlight. Let plants dry out slightly between waterings. Keep away from drafts and note that plants may go dormant if the temperature falls below 60 F.
String of hearts. Photo by Shelley Durocher, 2024.
Philodendrons (P. hederaceum) have been grown for ages and with good reason. These tough, vining plants with heart-shaped leaves tolerate the lower light levels found in many homes. Stems may grow 3 feet or longer and plants are best suited to a hanging basket or trellis. Exciting newer cultivars such as ‘Brasil’, ‘Cream Splash’ and ‘Rio’ offer variegated leaves. Grow plants in bright, indirect light and avoid overwatering. Trim plants if they overgrow their bounds.
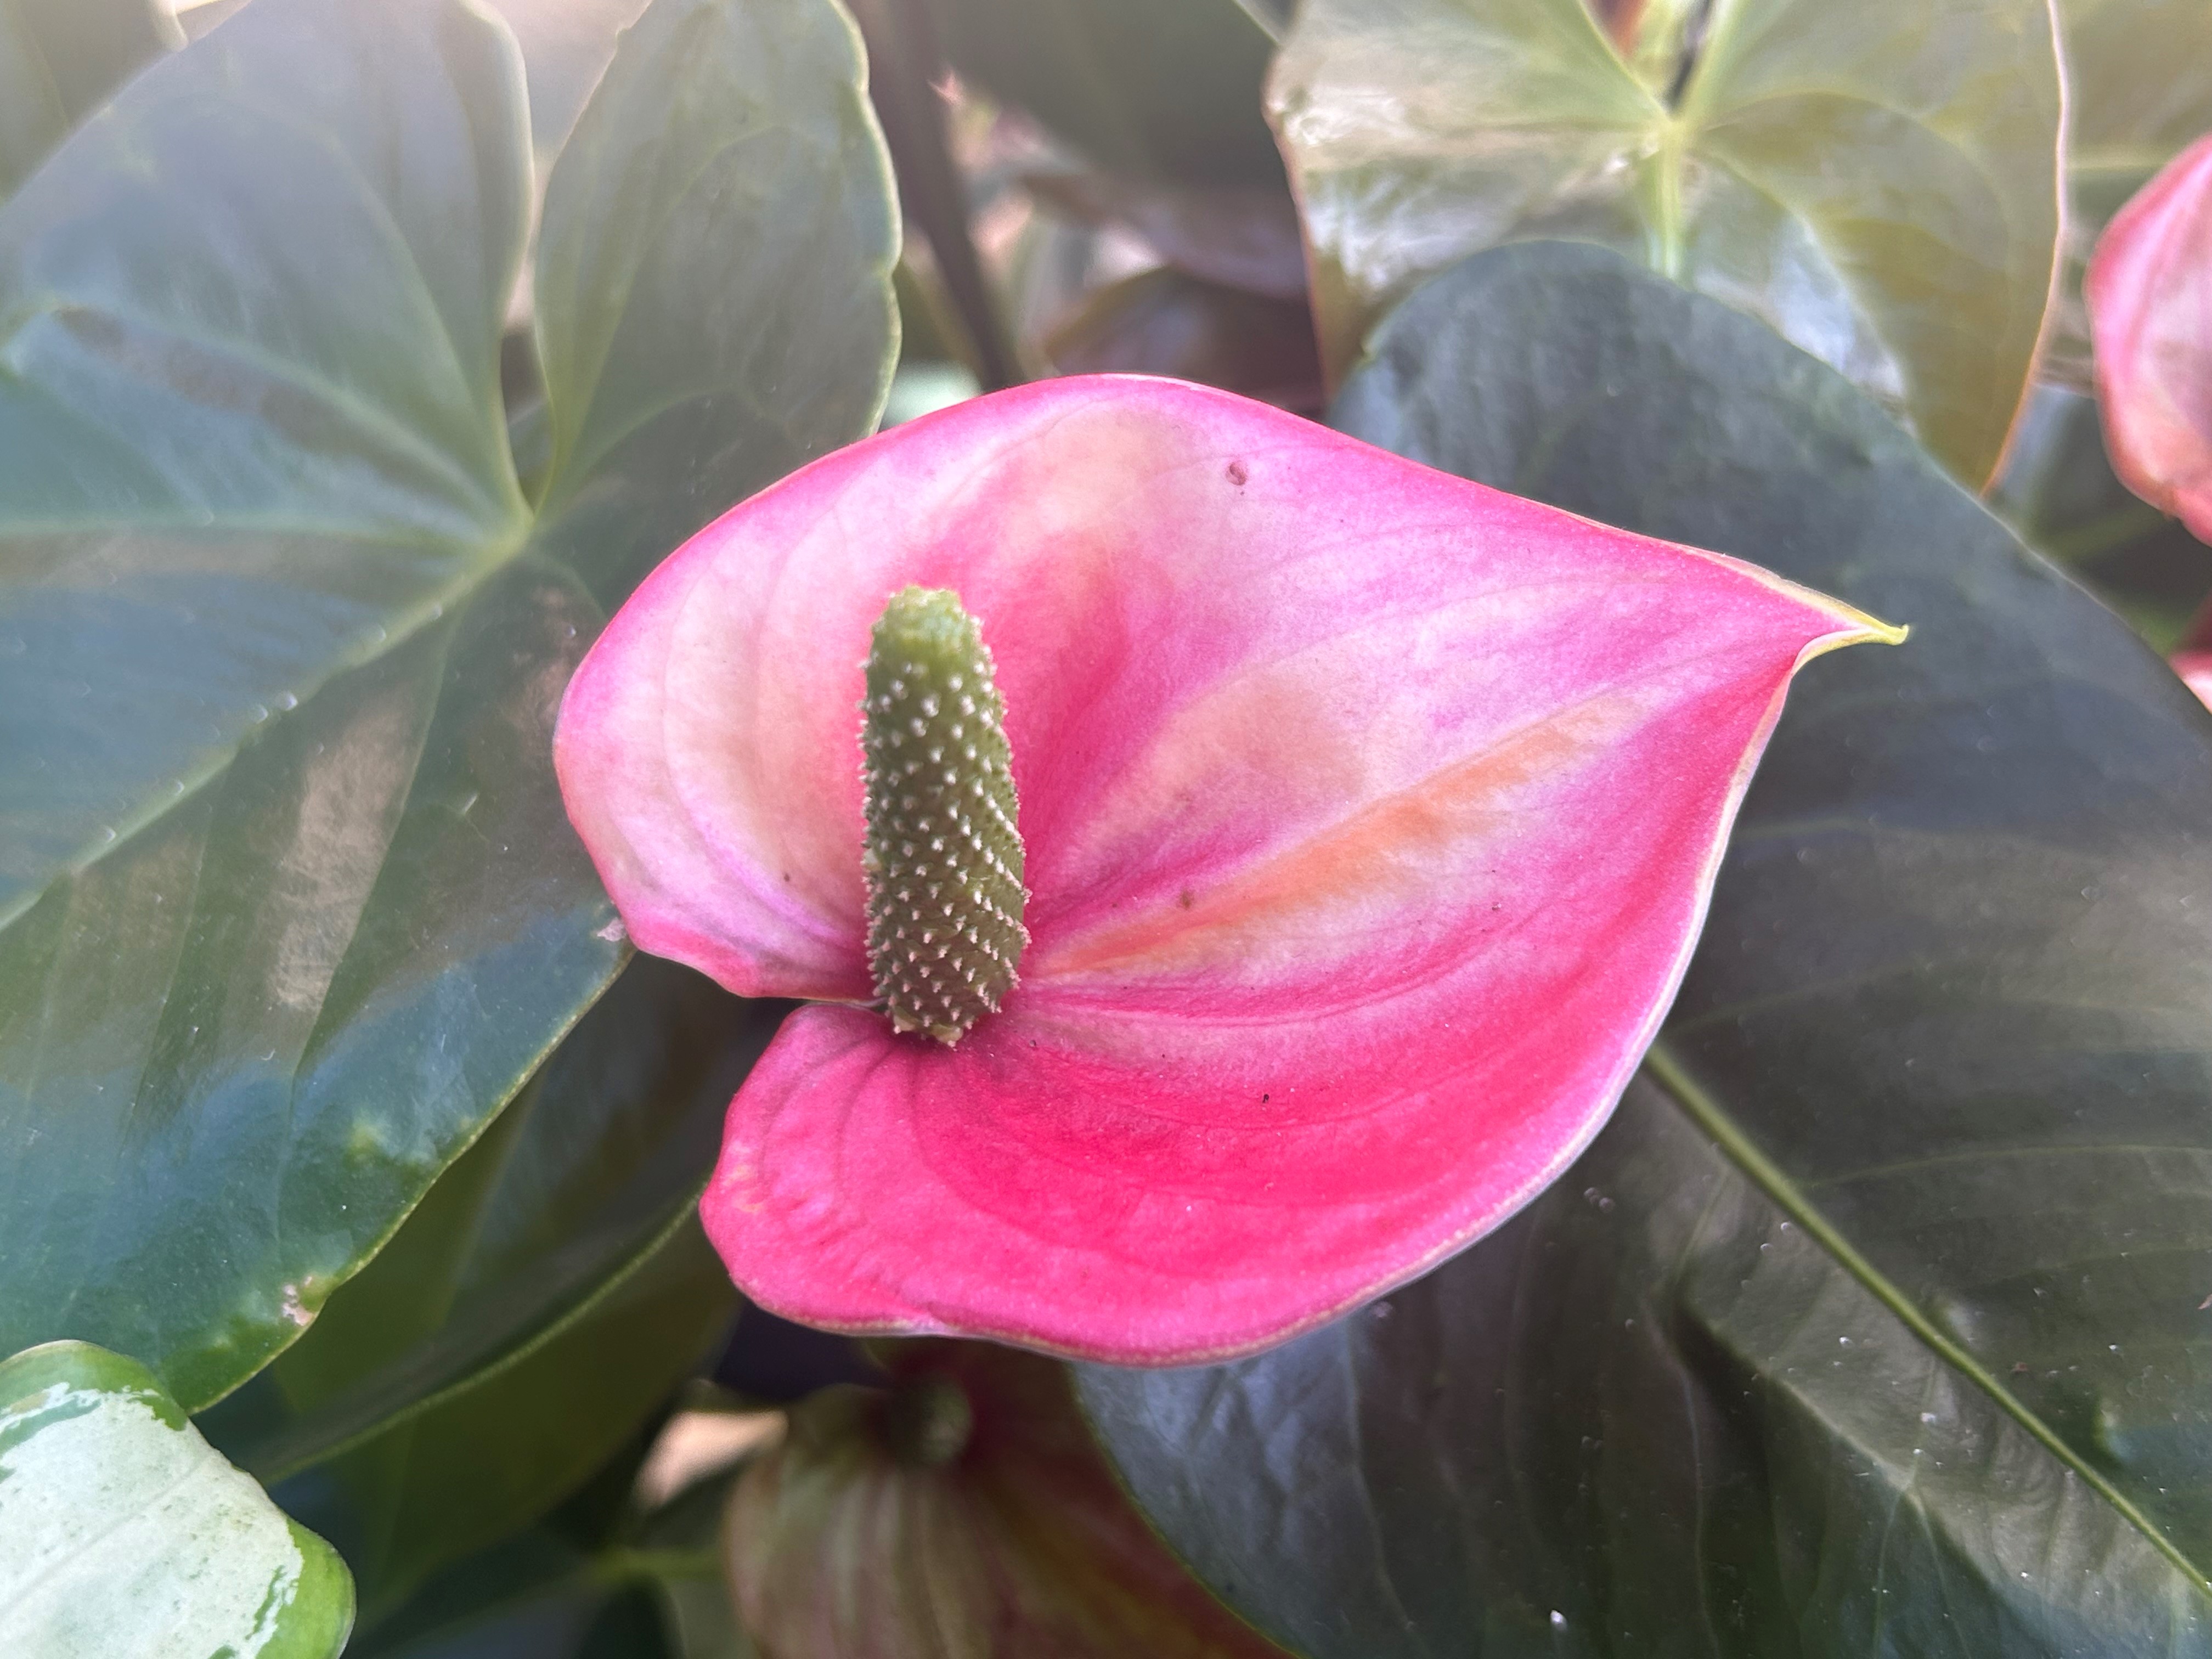
More recently, anthuriums with their flashy colored spathes in red, orange, pinks, and purples have been livening up the holiday plant scene. Both the spathes, which are modified leaves, and the true glossy, green leaves are shaped like hearts. Plants grow to about 16 inches high and if content will produce long-lasting colorful spathes several months of the year. Tiny flowers are on the tail-like spike that emerges from each spathe. Anthuriums also appreciate bright but indirect light, a well-draining, acidic soilless potting media and to be kept moderately moist.
Anthurium. Photo by Shelley Durocher, 2024
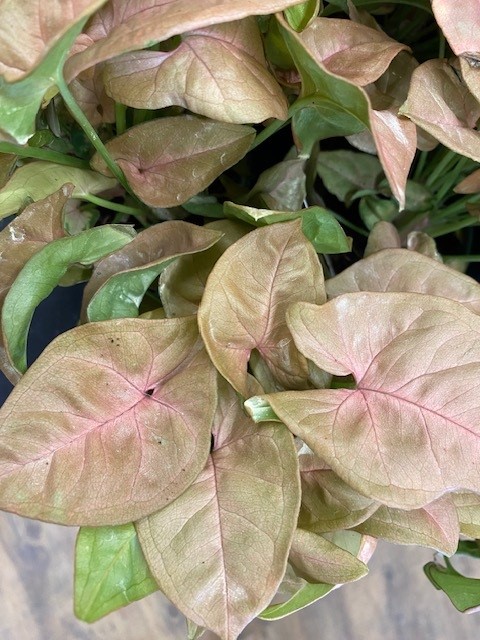
Similar in care to anthuriums, syngoniums have heart-shaped leaves and new varieties come in various shades of pink, purplish red and even variegated cultivars. Syngoniums are evergreen climbers but can be maintained as a shrubby houseplant if trailing stems are removed. As the plant ages, leaves become more arrow-shaped. Plants enjoy warmth and humidity and do best in moderately moist potting mixes and in bright diffused light.
Pink syngonium, Photo by dmp, 2024.
A little harder to find but worth the search is the Heart Fern (Hemionitis arifolia). Like many tropical ferns, it prefers indirect light in a warm, humid location. Plants may reach 10 inches tall and wide. The leaves are dimorphic, with the sterile fronds being heart-shaped and the fertile ones resembling arrowheads. Unlike most ferns, the foliage is thick and leathery. Being an epiphyte, plants should be grown in a light, airy potting mix and kept moist at all times.
Lastly, there are varieties of English ivy (Hedera helix) with heart-shaped leaves. ‘Sweetheart’ and ‘Heart’ are two common cultivars. Blue-green leaves form along stems that can be trimmed to any length. Grow as a hanging basket or in a decorative pot. English ivy enjoys cooler temperatures and bright but diffused light. East or north facing windows are ideal locations.
This year, mix it up a little for Valentine’s Day and give the heart-felt gift of a plant with heart-shaped leaves. Do note that some of the above plants are toxic if consumed so should be kept away from children and pets.
Plants need at least seventeen essential nutrients to complete their life cycles. Scientists group these essential nutrients into macronutrients (carbon, hydrogen, oxygen, nitrogen, potassium, phosphorus, sulfur, calcium and magnesium), which are required in large quantities and micronutrients (zinc, iron, copper, boron, manganese, chlorine, molybdenum and nickel), which are required in small quantities. Sufficient amounts of these nutrients are required in order for plants to produce well. If there is a deficiency of any essential element, yield and quality can be reduced. Also, too much a nutrient can be toxic to plants. Diagnosing nutrient deficiencies and toxicities are important for growers and gardeners to ensure optimum yield and quality.
When low on an essential nutrient, plants exhibit distinct visual symptoms that allows us to distinguish which nutrient is deficient. A first step in diagnosing nutrient deficiencies is to describe what the symptoms look like. Symptoms caused by nutrient deficiencies are generally grouped into five categories: 1) stunted growth; 2) chlorosis or yellowing; 3) leaf spots; 4) purplish-red coloring; and 5) necrosis (death of tissue). The next step is to identify whether the deficiency symptoms appear on older (lower) leaves or younger (upper) leaves first. If the deficiency symptoms appear on older leaves first, then the deficiency symptoms are possibly caused by one of the nutrients that are mobile in plants, such as nitrogen, phosphorus, potassium, magnesium, chlorine, or molybdenum. In contrast, deficiency of nutrients that are immobile (calcium, sulfur, boron, copper, iron, zinc, manganese, nickel), the symptoms first appear on younger or upper leaves.
Nitrogen deficiency symptoms are chlorosis of lower leaves (light green to yellow), stunted and slow growth and, in severe cases, necrosis of older leaves. Nitrogen deficient plants will mature early and crop quality and yield are often reduced. In cereal crops, chlorosis appears as an inverted “V” down the midrib. Insufficient amounts of N in cereals also result in fewer tillers, slender and weak stalks, short heads, and low grain protein content. Leaf curling and small tubers are common in potatoes deficient of N.
Chlorosis appearing as an inverted ‘V’. Photo contributed by H. Tao
Nitrogen deficiency results in slender and weak stalks in cereal crops. Photo contributed by H. Tao.
Canola plants show general chlorosis pattern in older leaves. Photo contributed by H. Tao.
Phosphorus deficiency symptoms occur in the older leaves first and typical deficiency symptoms are purpling of leaves and leaf margins and stunted growth. Plants that are deficient in phosphorus are generally weak and maturity is delayed. When phosphorus deficient, small grains tend to be stressed and predisposed to root rot diseases. Potato phosphorus deficiency symptoms include leaves curling upward and tubers having brown internal specks, often radiating out from the core.
Phosphorus deficiency in corn. Note the purplish color of the leaves. Photo contributed by H. Tao.
Canola leaves exhibit purple coloration due to phosphorus deficiency. Photo contributed by H. Tao.
Potassium deficiency symptoms first appear on older leaves. Typical deficiency symptoms are yellowing and necrosis of the leaf margins. When potassium deficiency is severe, older leaves turn yellow with tissue necrosis along the margins, but the upper new leaves may stay green. Potassium-deficient plants tend to lodge late in the growing season. Sometimes one may confuse potassium and nitrogen deficiency because both show typical chlorosis that appear on older (lower) leaves first. The difference is the chlorosis starts from the tip and progress along the ribs of the leaf if nitrogen is deficient and the chlorosis start from the tip and progress along the edge of the leaf if potassium is deficient.
Chlorosis due to nitrogen deficiency starts at the tip and progresses along the ribs. Photo contributed by H. Tao.
Chlorosis due to potassium deficiency starts at the tip and progresses along the leaf edges. Photo contributed by H. Tao.
Another nutrient that is commonly found deficient is calcium. Typical calcium deficiency symptoms are poor leaf expansion, curling followed by necrotic patches in the young leaves. Calcium deficiency can cause misshapen fruit and aborted buds. If you find the tip of tomatoes or peppers rotting, cavity spots in carrots or black heart in peanuts and celery, it’s likely the plants are calcium deficient. However, don’t hurry apply calcium fertilizers. Check on other stresses such as drought because lack of moisture in the soil can lead to insufficient uptake and transportation of calcium within plants, which leads to symptoms similar to calcium deficiency appearing.
Calcium deficiency may cause leaf curling and dead patches. Photo contributed by H. Tao.
Blossom end rot in tomatoes. Photo by D. Pettinelli
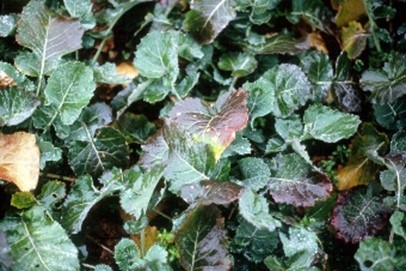
In sandy and low organic matter soils, sulfur deficiency can occur. Typical sulfur deficiency symptoms are reduced plant growth rate as well as stunted and thin stemmed plants. In cruciferous crops (such as cabbage, broccoli, canola, rapeseeds, etc.), light green to yellow discoloration appears in younger leaves first. Undersides of leaves of cole crops (cabbage, broccoli, cauliflower, etc.) may take on a reddish color and leaves may be cupped inward.
Thinned stemmed and stunted plants may suggest a sulfur deficiency. Photo contributed by H. Tao
Sulfur deficient cole crops may exhibit a reddish color and cupped leaves. Photo contributed by H. Tao.
Precautions in identifying nutrient deficiency by visual clues alone include: (1) Many symptoms appear similar. For instance, nitrogen and sulfur deficiency symptoms can look very much alike especially when plants are young, and the deficiency is severe. (2) Multiple deficiencies and toxicities may occur at the same time. More than one deficiency or toxicity can produce symptoms, or possibly an excess of one nutrient can induce a deficiency of another. For example, excessive phosphorus fertilizer application can cause zinc deficiency and vice versa. (3) Some crop varieties are naturally light in color. (4) Other stresses such as disease, drought, excess water, genetic abnormalities, herbicide and pesticide residues injury, insects, and salt injury can also cause symptoms that may be similar to a nutrient deficiency. For instance, plants may exhibit phosphorus deficiency symptoms (reddish leaf color) in early spring even if your soil test is above optimum level. Fertilization is unnecessary because the symptoms will disappear as the weather gets warmer and plants get bigger. Salt injury can cause brown leaf margins that resemble a molybdenum deficiency. However, salt injury symptoms normally appear suddenly as a result of too much fertilizer and show up on all the leaves. (5) Plants may be nutrient deficient without showing visual symptoms. Experience and knowledge of field and management practices are necessary to aid the diagnostics. The best way to confirm if you have nutrient deficiency is to test your soil and plant tissue. Another way to verify if your crop is deficient of a nutrient is to apply this nutrient in a small area. If the deficiency symptoms disappear, it is likely that your crop is deficient of this nutrient. For questions on nutrient management in the garden or on farms, feel free to contact the UConn Soil Nutrient Analysis Lab at (860) 486-4274.
By Haiying Tao, PhD, Assistant Professor, UConn Plant Science LA